User Interface (UI) Management
Core Functions
Show Your Data / Text on Screen
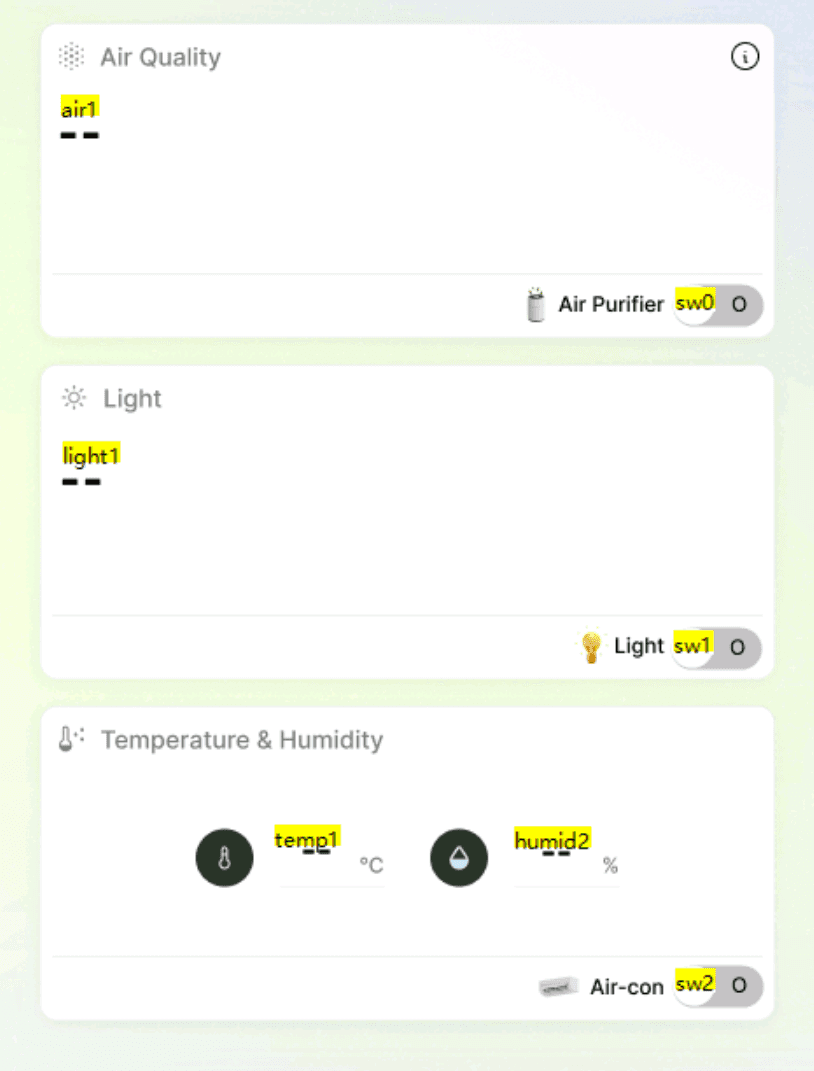
The following example will show how to use incipe.onscreen() function to get the data from sensor and print on the IA Screen.
float temperature = incipe.getTemperature();
float humidity = incipe.getHumidity();
incipe.onscreen("temp1", temperature);
incipe.onscreen("humid2", humidity);
if (incipe.getLightIntensity() > XXX){
incipe.onscreen("light1", "Bright");
}
else {
incipe.onscreen("light1", "Dark");
}float temperature = incipe.getTemperature();
float humidity = incipe.getHumidity();
incipe.onscreen("temp1", temperature);
incipe.onscreen("humid2", humidity);
if (incipe.getLightIntensity() > XXX){
incipe.onscreen("light1", "Bright");
}
else {
incipe.onscreen("light1", "Dark");
}float temperature = incipe.getTemperature();
float humidity = incipe.getHumidity();
incipe.onscreen("temp1", temperature);
incipe.onscreen("humid2", humidity);
if (incipe.getLightIntensity() > XXX){
incipe.onscreen("light1", "Bright");
}
else {
incipe.onscreen("light1", "Dark");
}
Control Image Element Visibility
The element on screen is set by yourself (e.g. "pop_up").
For visibility 1 means appear, 0 means hide.
UI Button Click Detection (screenReadValue)
In USART software, you need to create a variable (e.g. press) affiliated to a button.
When the button is clicked, press.val becomes 1 or True.
incipe.screenReadValue("press.val")incipe.screenReadValue("press.val")incipe.screenReadValue("press.val")The following example will print hello if the button is pressed.
if(incipe.screenReadValue("press.val") == true)
{
  Serial.println("Button Clicked");
}if(incipe.screenReadValue("press.val") == true)
{
Serial.println("Button Clicked");
}if(incipe.screenReadValue("press.val") == true)
{
Serial.println("Button Clicked");
}Advanced IA Screen Memory Write (Data Plotting)
This function can help plot useful experimental graphs on IA screen, with specific data, e.g. humidity
incipe.screenWriteValue("plot.val", incipe.getHumidity());incipe.screenWriteValue("plot.val", incipe.getHumidity());incipe.screenWriteValue("plot.val", incipe.getHumidity());Control Screen Mode
This is a helper function interfacing with IA Kit embedded screen basic HMI command.
For example:
Option 1: "dims", [0,100]
Option 2: "sleep", [0,1]
Option 3: "volume", [0,100]
Option 4: "vis-name", [0,1]
More screen options coming soon!
incipe.screenMode("volume",50); incipe.screenMode("volume",50); incipe.screenMode("volume",50); Control Screen Brightness with Light Sensor
The following is a helper function interfacing with IA Kit embedded screen brightness.
Screen brightness is adjusted according to real-time light intensity value from sensor.
incipe.controlBrightness(incipe.getLightIntensity());
incipe.controlBrightness(incipe.getLightIntensity());
incipe.controlBrightness(incipe.getLightIntensity());
Additional Information (USART)
If you want to use more customised screen features you can view the screen documentation here.
To use the extended screen features, please scroll down and find the C language code.
Change Page
For example when we are using the change page function
To use in our IA Kit, we need to add Serial2. before the function
Serial2.printf("page main\xff\xff\xff");Serial2.printf("page main\xff\xff\xff");Serial2.printf("page main\xff\xff\xff");Beep Example
Another example would be using the beep feature. Put the following code in a for loop.
Serial2.print("beep 180\xFF\xFF\xFF");
delay(180);Serial2.print("beep 180\xFF\xFF\xFF");
delay(180);Serial2.print("beep 180\xFF\xFF\xFF");
delay(180);